
How To Change Your Apple Watch Band
Posted by The Watch Prince on Jun 23rd 2020
Changing the Watch Band on Your Apple Watch is Easy!
First, you will need to remove the existing watch band from your Apple Watch. This can be done in just two simple steps.
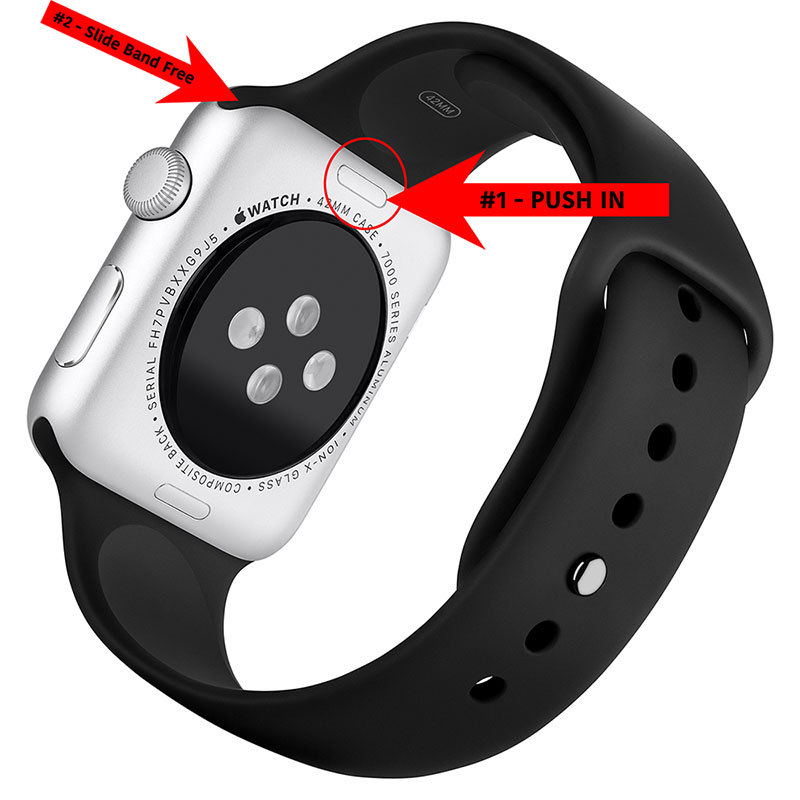
STEP 1 - On the backside of your apple watch, push in the oval shaped button near the side of the strap you are ready to remove. This can be done with a fingernail or a small object. While holding the button down, proceed to step 2.
STEP 2 - Slide your watch band free of the Apple Watch case. The watch band should slide free with only minimal pressure. If you meet significant resistance, make sure that you are pressing the oval shaped button down with sufficient force.
Now that you have freed one side of your watch band, repeat this process on the other side of the watch case.
This image depicts the two step process to remove a watch strap from an Apple Watch.
You are now ready to install your new watch band!
If you are purchasing a watch band from The Watch Prince found within the "Watch Bands for Apple Watch" page, your new watch band will arrive with an adapter attached. Simply slide the new adapter into the Apple Watch case - you will hear a slight click as the adapter locks securely into place. Your new watch band is now installed and your Apple Watch is ready for wear!
If you are purchasing a watch band from a different section on The Watch Prince website (a band without an adapter) or wish to use a different leather watch band that you already own, you will need adapters to connect the strap to your Apple Watch. Click Here, to browse The Watch Prince's collection of Adapters for Apple Watch. These adapters allow standard watch bands to attach via spring bar connection allowing every watch band to become a watch band for Apple Watch!